End-to-End testing with Puppeteer and Jest

Jest and Puppeteer are very popular Javascript frameworks for End-to-End testing. What is end-to-end testing, and what are the other types of testing?
Testing is a crucial part of every software development process. It can drastically reduce your project's cost and increase your team's productivity. There are basically three main types of tests:
- Unit testing – With unit tests, we test small isolated pieces of our code.
- Integration testing - In this type of testing, we combine and test individual units and test them as a group.
- End-to-end (E2E) testing - This is defined as testing the complete functionality of some application.
Throughout this tutorial, we will be focusing on E2E testing, as the title suggests. We will be writing our tests with two powerful tools, which are Jest and Puppeteer:
- Jest is a fully featured testing framework developed by Facebook. It requires very little configuration and works out of the box.
- Puppeteer: A Node.js library created by Google, which provides a convenient API to control Headless Chrome.
What You Will Learn?
1. How to integrate. Puppeteer with Jest
2. Testing forms
3. Testing frontend in general
4. Taking a screenshot
5. Emulating mobile device
6. Intercepting requests
7. How to target newly opened pages in the headless browser
8. And how to debug your tests
Project Setup
First, you will need to download or clone the project I prepared, the GitHub Starter Project. If you don't prefer to code along, you can download the finished GitHub Final Project.
After downloading Starter Project:
1.) cd into the repository
cd /E2E_Testing_with_Puppeteer_Starter
2.) Install dependencies
npm install
3.) Run the project
npm run dev-server
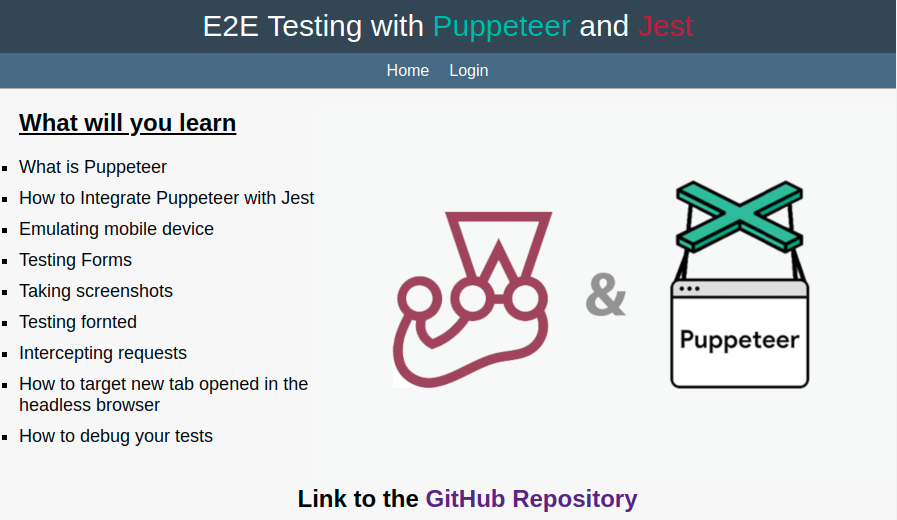
Great, now our application is running on http://localhost:8080. After visiting it you should see something like this:
The next thing to do is to install all the necessary tools.
npm install puppeteer jest jest-puppeteer
We will also need to install jest-cli globally to run a single test separately from others.
npm install -g jest-cli
First Look at Puppeteer
Let's run Puppeteer for the first time on its own, so you will actually see how it works alone without Jest in the first place. In the root of the project ,you will find puppeteer_firts_try.js file, which contains some basic instructions for Puppeteer.
Run it with:
node puppeteer_firts_try.js
In puppeteer_firts_try.js:
const puppeteer = require('puppeteer');
(async function main(){
  try {
    const browser = await puppeteer.launch({ headless: false });
    const page = await browser.newPage();
    await page.goto('http://localhost:8080', {waitUntil: 'domcontentloaded'});
    await new Promise(resolve => setTimeout(resolve, 5000));
    console.log('done'); await browser.close();
  }
  catch (e) {
    console.log('Err', e);
  }
})();
As you can probably already see, Puppeteer relies heavily on promises, so we will always use it with async/await. With puppeteer.launch() on line ,5, we are launching a new Chromium instance, in options we specify:
headless: false, which means that the browser won't run in the headless mode (basically without a graphical user interface).
On the next line, we open a new page, and then on line 7, we navigate to http://localhost:8080.
waitUntil: 'domcontentloaded'
The option on line 7 specifies that our code will wait until the DOM content is loaded. Line 9 just stops the app for 5 seconds so you can observe it. In line 11, we close the browser.
Integrating Puppeteer with Jest
Now, we will integrate Puppeteer with Jest. But why is this necessary? Puppeteer isn't a testing framework; it is a tool for controlling Headless Chrome. So, to make our work easier, we combine it with Jest, which provides great testing utilities.
Jest Configuration
Create jest.config.js file in the root of the project and paste this code in:
module.exports = {
    preset: "jest-puppeteer",
    globals: {
      URL: "http://localhost:8080"
    },
    testMatch: [
      "**/test/**/*.test.js"
    ],
    verbose: true
}
In line 2, we specify jest-puppeteer preset, which will allow us to use Jest with Puppeteer. In globals we declare variables, which will be available in our whole test suite. And in testMatch we are only saying in which folder and for which files Jest should be looking for.
Configuration for jest-puppeteer preset
Create jest-puppeteer.config.js file in the root of the project and use this code:
module.exports = {
    launch: {
        headless: process.env.HEADLESS !== 'false',
        slowMo: process.env.SLOWMO ? process.env.SLOWMO : 0,
        devtools: true
    }
}
In launch object, we can specify options for the Chromium instance, which will be launched before our tests run and which will be accessible to all our test files. So here, you can specify all the options, which you would normally pass to puppeteer.launch(). On line 3, we specify whether Puppeteer should launch the browser in headless mode or not. And on line 4 we are sazing to Puppeteer to run in slowMo, which slows Puppeteer down by milliseconds that we specify. So we will be able to observe what it actually does. Both these options are great for debugging.
Writing Our Tests
Testing Frontend
With everything set up, we can finally start writing our tests. Let's start with something simple. In src/test/ you will find a file named frontend.test.js into which you need to write this code:
const timeout = process.env.SLOWMO ? 30000 : 10000;

beforeAll(async () => {
    await page.goto(URL, {waitUntil: 'domcontentloaded'});
});

describe('Test header and title of the page', () => {
    test('Title of the page', async () => {
        const title = await page.title();
        expect(title).toBe('E2E Puppeteer Testing');

    }, timeout);
});
Now you can run:
npm run test
And you should see something like this:
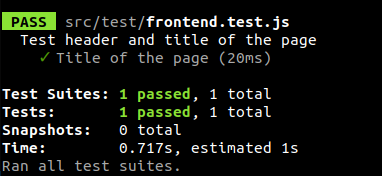
Let's analyze this code line by line. In first line we are setting timeout variable, which we are later using to specify timeout for our tests (note that we specify this timeout in milliseconds). So as you can see, if we are running Puppeteer in slowMo, we increase our timeout from 10000 ms to 30000 ms. This ensures that our tests won't timeout. On line 3 we use beforeAll, this function will run some code before all tests in our file are executed. We pass to this function an async callback in which we navigate to URL what we specified earlier as a global variable. But from where we took pagevariables? page is actually exposed to each test file in our test suite thanks to the jest-puppeteer preset. On line 7 we are using describe which allow us to group tests together. And then, we write our actual test. This test is rather simple on line 9 we get page title and then we use Jest built in assertion library expect to test if we got correct title.
Now, let's add another test to this file. Paste this code right under the first test in our describe block:
test('Header of the page', async () => {
        const h1Handle = await page.$('.learn_header');
        const html = await page.evaluate(h1Handle => h1Handle.innerHTML, h1Handle);

        expect(html).toBe("What will you learn");
    }, timeout);
On line 2, we use page.$(), which allows us to select an HTML element using a normal CSS selector. It returns an ElementHandle, which we can later use to get the element's inner HTML. On line 3, we use page.evaluate(),which evaluates a function in the page context. That way, we basically get access to the inner HTML of our ElementHandle.
Form Tests
With some basic tests already written, we will now try to test one simple form which I have prepared for us.
Rename form.test.js.example in src/test to form.test.js and paste this code in to describe block which is alredy there:
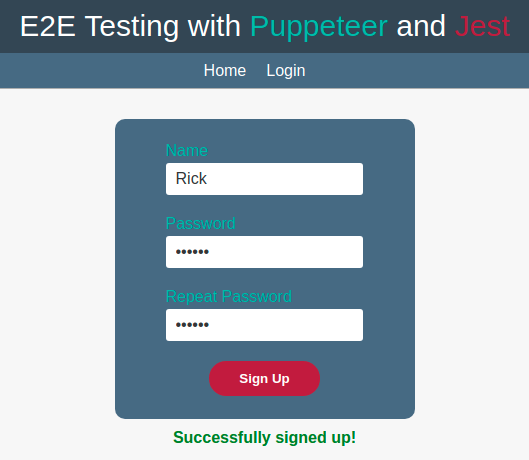
test('Submit form with valid data', async () => {
        await page.click('[href="/login"]');

        await page.waitForSelector('form');
        await page.type('#name', 'Rick');

        await page.type('#password','szechuanSauce');
        await page.type('#repeat_password','szechuanSauce');

        await page.click('[type="submit"]');
        await page.waitForSelector('.success');
        const html = await page.$eval('.success', el => el.innerHTML);

        expect(html).toBe('Successfully signed up!');
    }, timeout);
So, the first thing we do in this snippet is click on the Login link in the navigation. We use page.click() for this, which takes as an argument a CSS selector. Since we navigated to different URLs, we used page.waitForSelector() to wait till our form was rendered by DOM so we could start to do something with it. Then we use page.type() method to fill out our form, this method takes two argument a CSS selector and a text, which we want to type. We then proceed by submitting our form, waiting for the success message to appear, and getting its innerHTML with page.$eval().
If you now run, npm run test you should have three passing tests.
Taking Screenshots on Desktop and Mobile
With our form and frontend tested, we can turn our attention to screenshot taking and emulation of mobile devices in Puppeteer.
Rename screenshots.test.js.example in src/test to screenshots.test.js and paste this code in to describe block that is already coded there:
    test('Take screenshot of home page', async () => {
        await page.setViewport({ width: 1920, height: 1080 });
        await page.screenshot({
            path: './src/test/screenshots/home.jpg',
            fullpage: true,
            type: 'jpeg'
        });
    }, timeout);
In this block of code we first set viewport of the page with page.setViewport() and then we take a screenshot with page.screenshot() to which we provide some options in order to specify where to store our image, and in what format to store it.
After running, npm run test you should be able to find an image called home.jpg in test/screenshots folder. Now, let's take screenshots while emulating a mobile device. First, add this line of code at the top of the file:
const devices = require('puppeteer/DeviceDescriptors');
And then add this test into our describe block:
test('Emulate Mobile Device And take screenshot', async () => {
    await page.goto(`${URL}/login`, {waitUntil: 'domcontentloaded'})
    const iPhonex = devices['iPhone X'];
    await page.emulate(iPhonex);
    await page.setViewport({ width: 375, height: 812, isMobile: true});
    await page.screenshot({
        path: './src/test/screenshots/home-mobile.jpg',
        fullpage: true,
        type: 'jpeg'
    });
}, timeout);
This code is similar to the previous one. The difference is that now we are requiring devices from puppeteer/DeviceDescriptorsOn line 3, we access the iPhone X from the device's object. In the next line, we emulate this device with the page.emulate(). Then, we simply take a screenshot, as in the previous code snippet.
Request Interception and Targeting Newly Opened Page
So now, we will examine some more advanced features, such as request interception. I will also cover how to target newly opened pages in a headless browser.
Rename general.test.js.example in src/test to general.test.js and copy and paste there this code snippet:
   test('Intercept Request', async () => {
        await page.setRequestInterception(true);
        page.on('request', interceptedRequest => {
            if (interceptedRequest.url().endsWith('.png')) {
                interceptedRequest.abort();
            } else {
                interceptedRequest.continue();
            }
        });
        await page.reload({waitUntil: 'networkidle0'});
        // await jestPuppeteer.debug();
        await page.setRequestInterception(false);
    }, timeout);
Here, on the first line, we set page.setRequestInterception() to true, which enables us to intercept outgoing requests. On lines 3-9 we are telling Puppeteer to abort every request, which ends with '.png'. So, thanks to this, our page won't be able to load the image, which is currently on the homepage, well at least after we reload the page, because the image was loaded before we set request interception. Then on line 10 we will reload our page with page.reload(), so we will be able to see that the image is not displayed. But how, actually, when Puppeteer tests are so quick ? That's what the commented code on the next line is for, but I will return to this in the debugging section. And on line 12, we set page.setRequestInterception() to false, which is very IMPORTANT! If you don't set it to false request, interception will be set to true for all other tests, which come after this one and can cause you many problems.
Now let's add our last test, with which I will show you how you can target newly opened pages with Puppeteer in a headless browser. Add this test to our describe block:
   test('Target newly opened page', async () => {
        const newPagePromise = new Promise(resolve => browser.once('targetcreated', target => resolve(target.page())));
        await page.click('.repo_link');

        const newPage = await newPagePromise;
        const title = await newPage.title();
        await newPage.close();

        expect(title).toBe('GitHub - Zovi343/E2E_Testing_with_Puppeteer_Final');
    }, timeout);
On line 2 we are creating new Promise in which we are listening with browser.on('targetcreated') if new target (page) was created. Again, we are able to access browser, because it is exposed to us thanks to the jest-puppeteer preset. Then, we click on the link on the homepage, which opens a new tab and points us to GitHub Starter Project. On line 7 we await Promise, which we created on line 2 and this Promise returns newly opened page. So, in the end, we are able to get the title of this newly opened page and make our assertions.
Debugging Your Test
Many times, you find yourself with a lot of failing tests, and it can be really hard to figure out what is going on only from the terminal. That's why I will show you some ways of debugging your tests.
Headless a SlowMo arguments
So, for debugging, you want to launch Puppeteer in headless mode and also in slow motion, so you will be able to actually see what is going on. Since we set these two options in jest-puppeteer.config.js all we need to do now is to set two environment variables when running our tests from the terminal.
Run:
HEADLESS="false" SLOWMO=100 npm run test
Running single Tests separately
Sometimes, you need to run one test separately from the others to find bugs. We will use the jest-cli we installed at the beginning to do this. Now, let's return to the request interception test because we couldn't observe it.
Run:
HEADLESS="false" SLOWMO=100 jest -t 'Intercept Request'
But that was still pretty fast, wasn't it? Let's fix this with jestPuppeteer.debug().
jestPuppeteer.debug()
jestPuppeteer.debug() suspends test execution and gives you time to see what is happening in the browser. In order to continue execution, you just need to press Enter. So now you can just uncomment line 11 from the code for request interception and run the previous command. You will clearly see that the image on the homepage is not displayed because the request for it was intercepted.
Bonus Puppeteer Recorder
In conclusion, I would like to suggest one Chrome extension that may be really handy when you are writing tests with Puppeteer. It is Puppeteer Recorder, which allows you to record your browser interactions and generate a Puppeteer script.
Conclusion
In this article, we explored two very popular frameworks: Jest and Puppeteer. We learned that combining these two tools gives us a very powerful setup for our testing environment. We covered a lot. You learned how to integrate Puppeteer with Jest, how to write different test cases, how to debug your tests, and more.